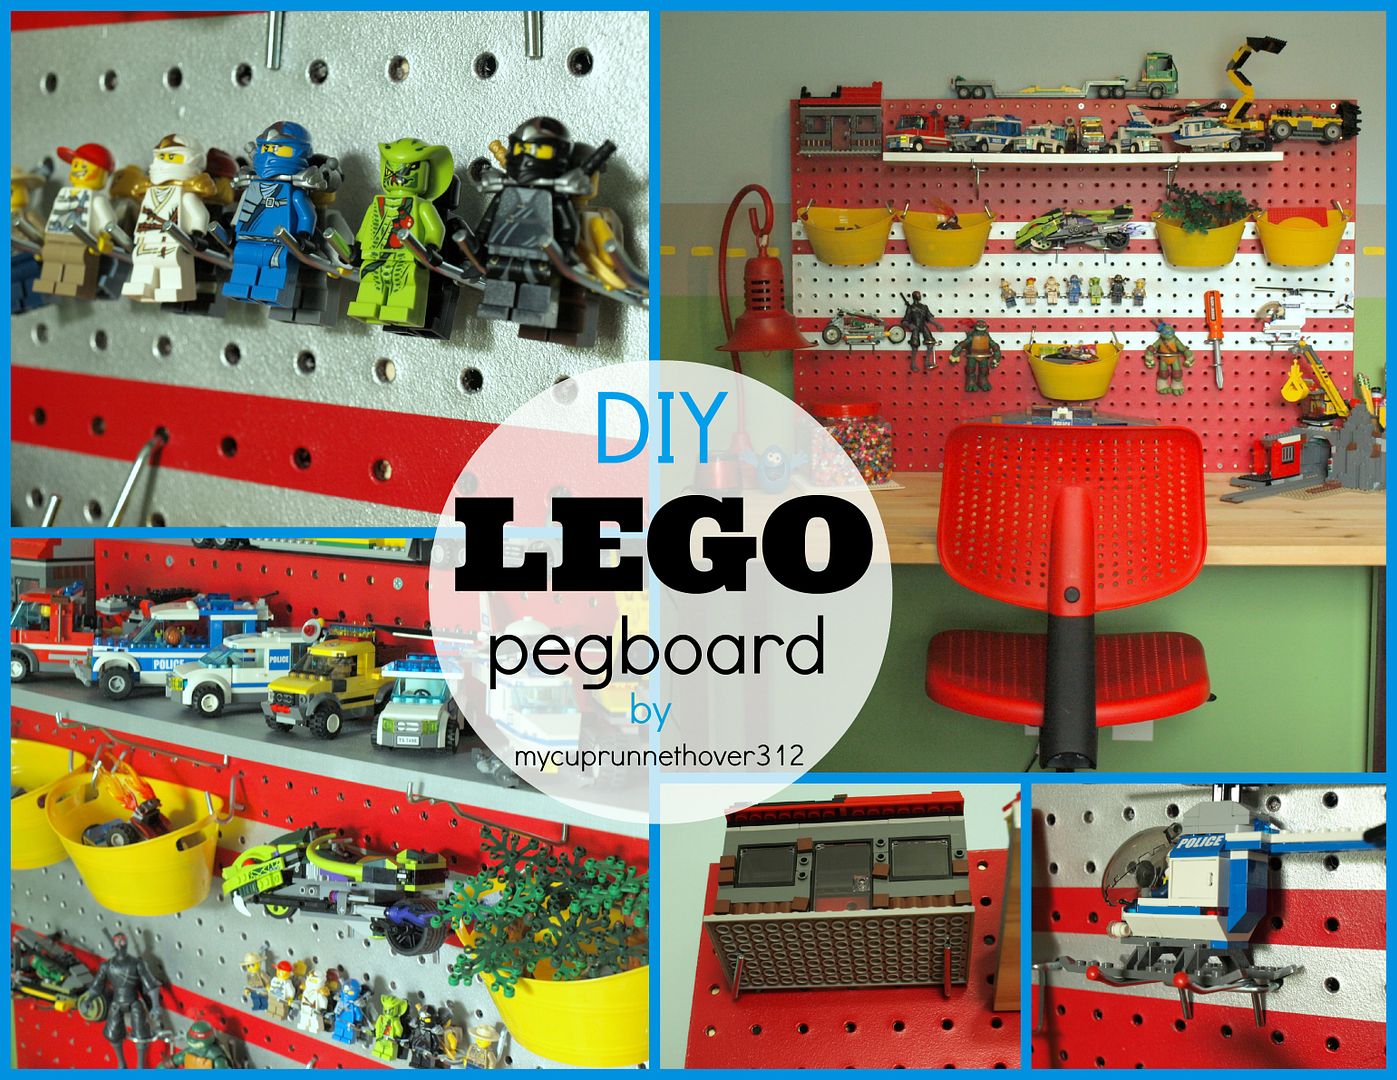
LEGO STORAGE PEGBOARD
Hey! Hey Friends! To say I am excited for this post is a bit of an understatement. I am bursting at the seams!! The Bug and I worked on this most of the day and I think it's finally ready to show you!
As a Mom, I constantly find myself growling under my breath at the mess path of destruction my kids tend to leave with toys.
I have an inner struggle. The complete Virgo in me thinks that everything should have a place. An organized, well thought out place.
I fight it because I also want my kids to play with the toys they have. Sometimes, this means leaving them out, so the battle of Lego people can begin again tomorrow where it left off. Grumble Grumble. Wrinkling nose....
My six year-old boy is obsessed with building Legos. He loves to sit and listen to music and put together all the STUFF. And take it apart and make new stuff.
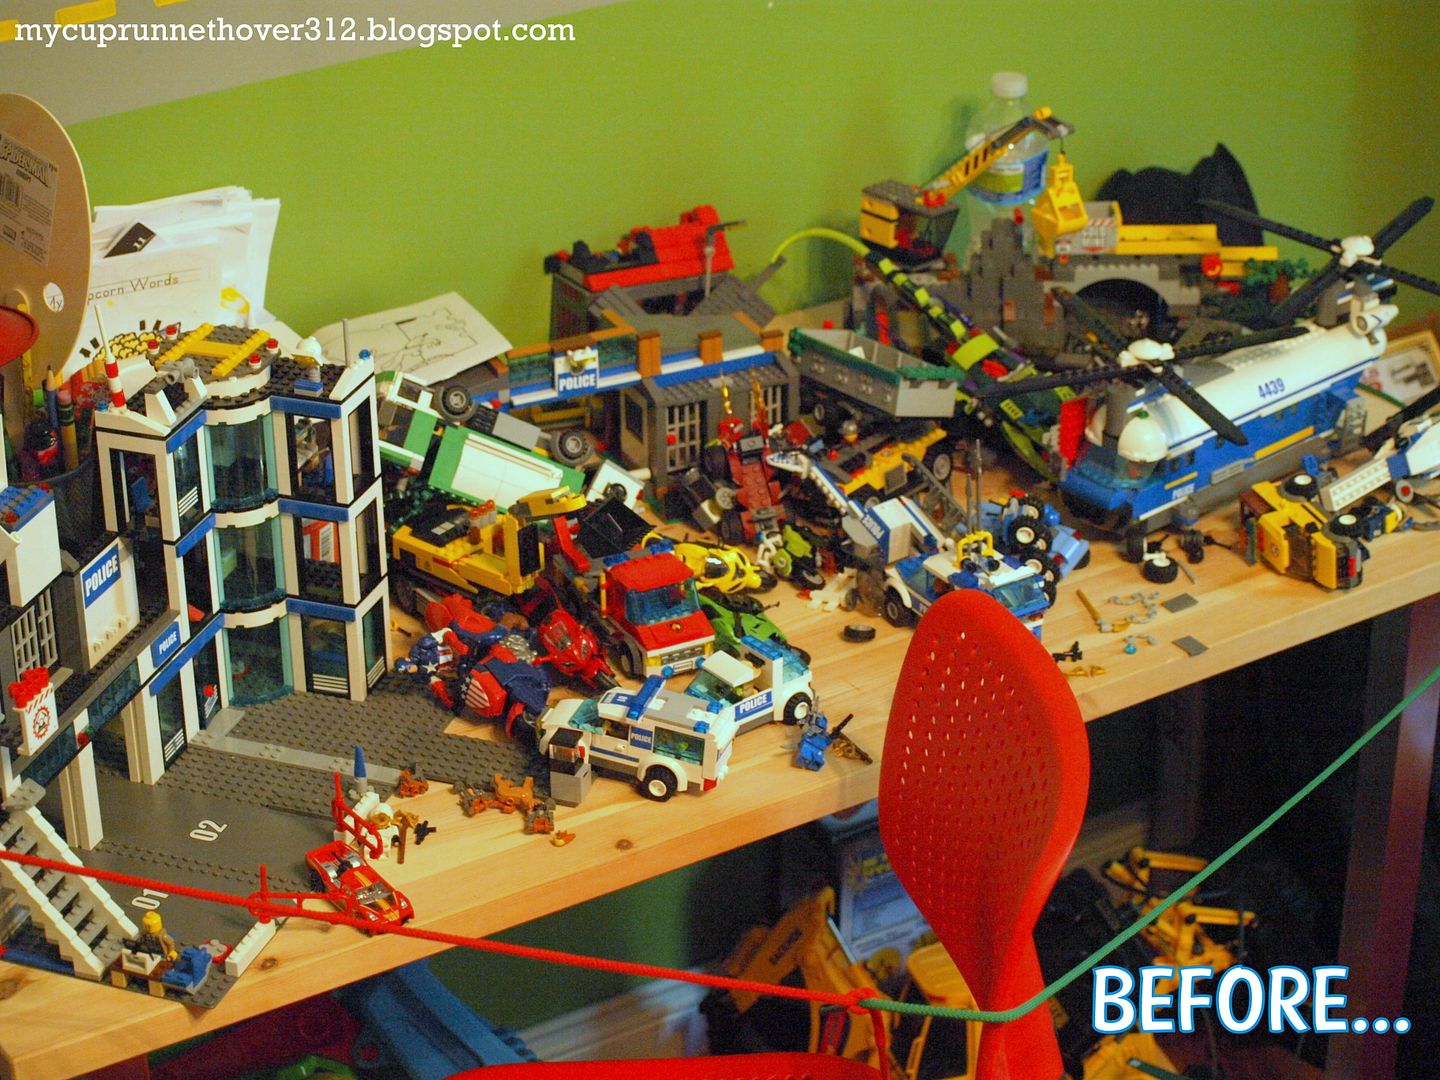
It's great, but I was noticing that the simple IKEA desk we purchased for him when school started looked like this. Yep, everyday.
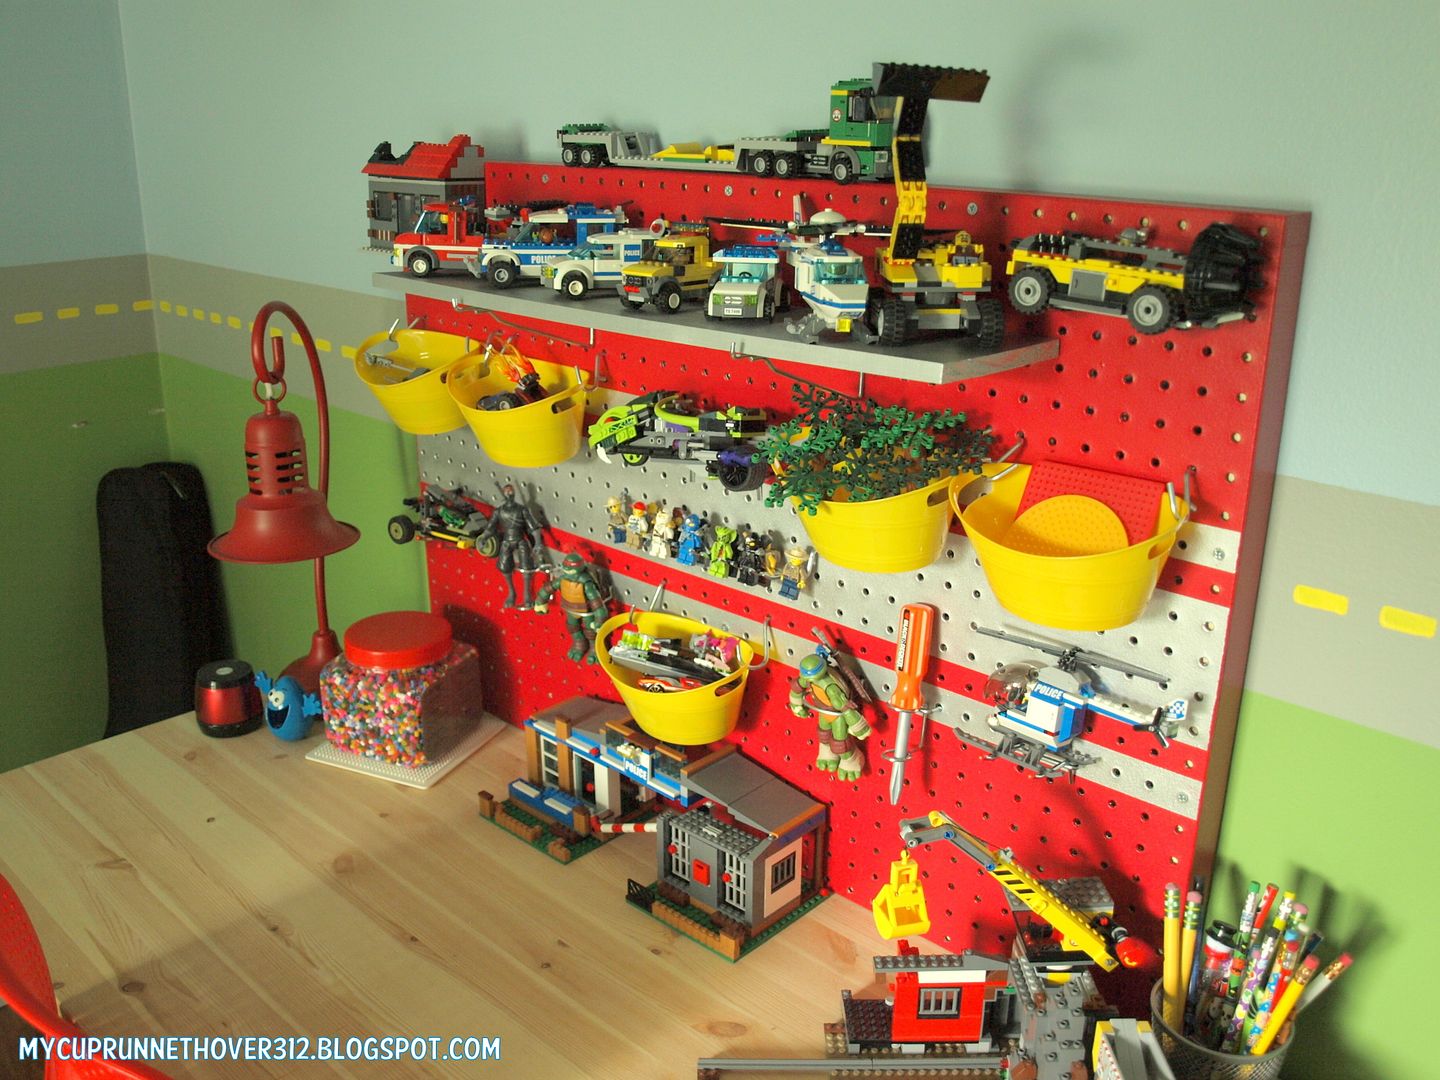
He even has it roped off in this picture - to warn visitors I suppose. The desk was making me CRAZY. I needed to get all the stuff off the desk!! But where do I go with it? UP! I grabbed a piece of pegboard and some 1X2s and got to work. I used the leftover red paint from The Boo's big girl room to paint the pegboard. It looked a bit plain so I added some frog tape and spray painted the metallic racing stripes.
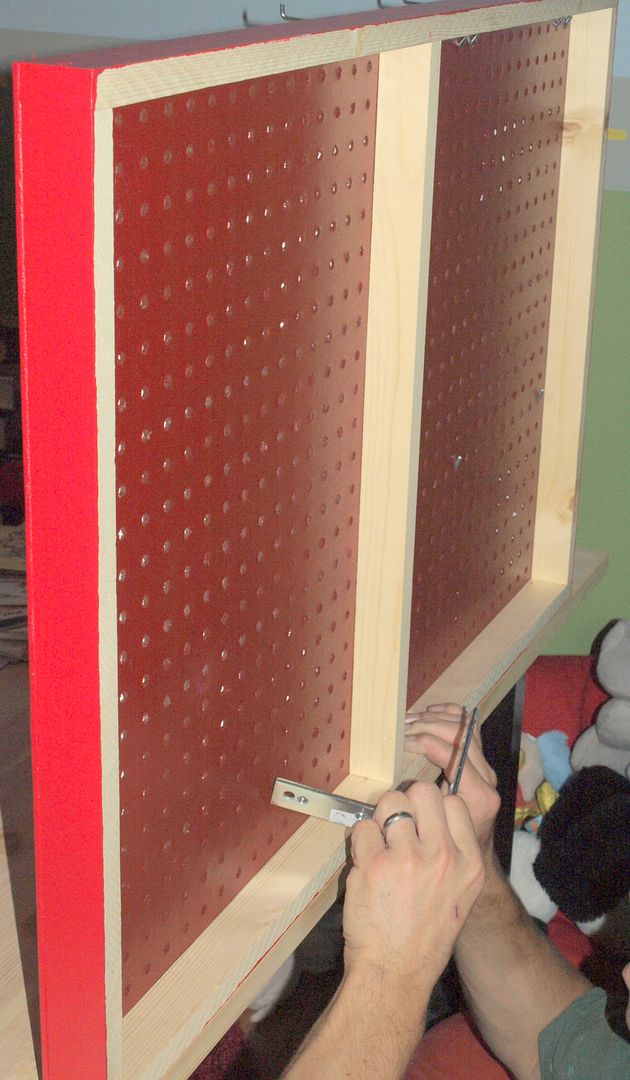
The hubs added a frame with the 1X2s on the back and attached it with screws right through the peg board. I made sure to paint the sides of the frame too. We placed the pegboard on the desk and attached it with L brackets. You could also hang it on the wall too! It would work just as great.
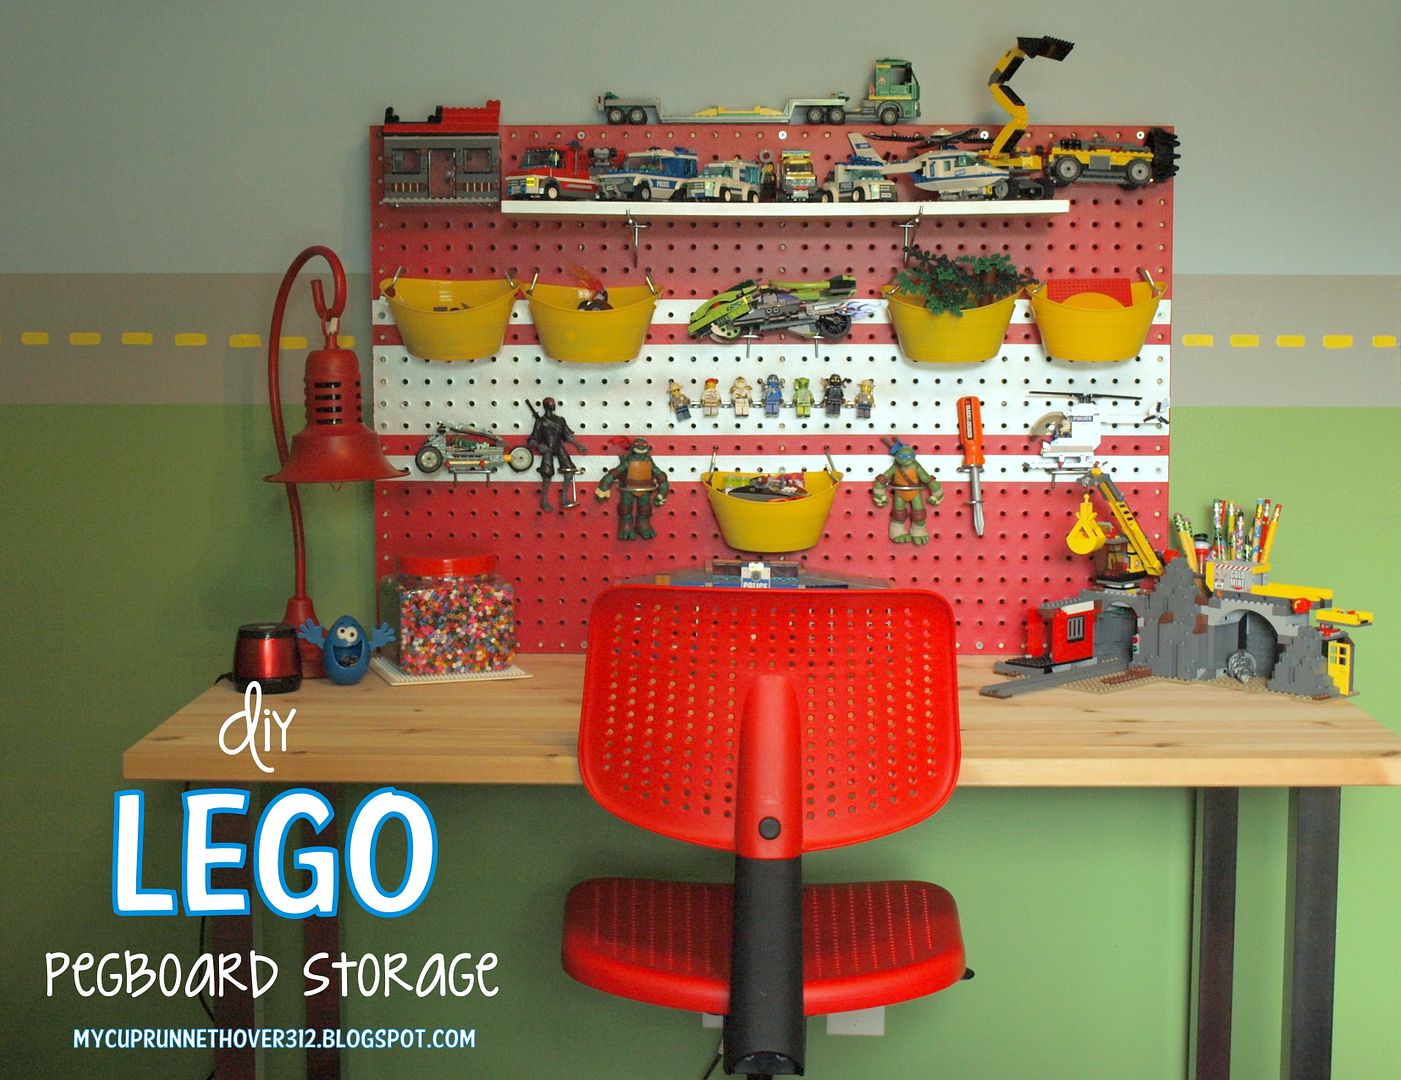
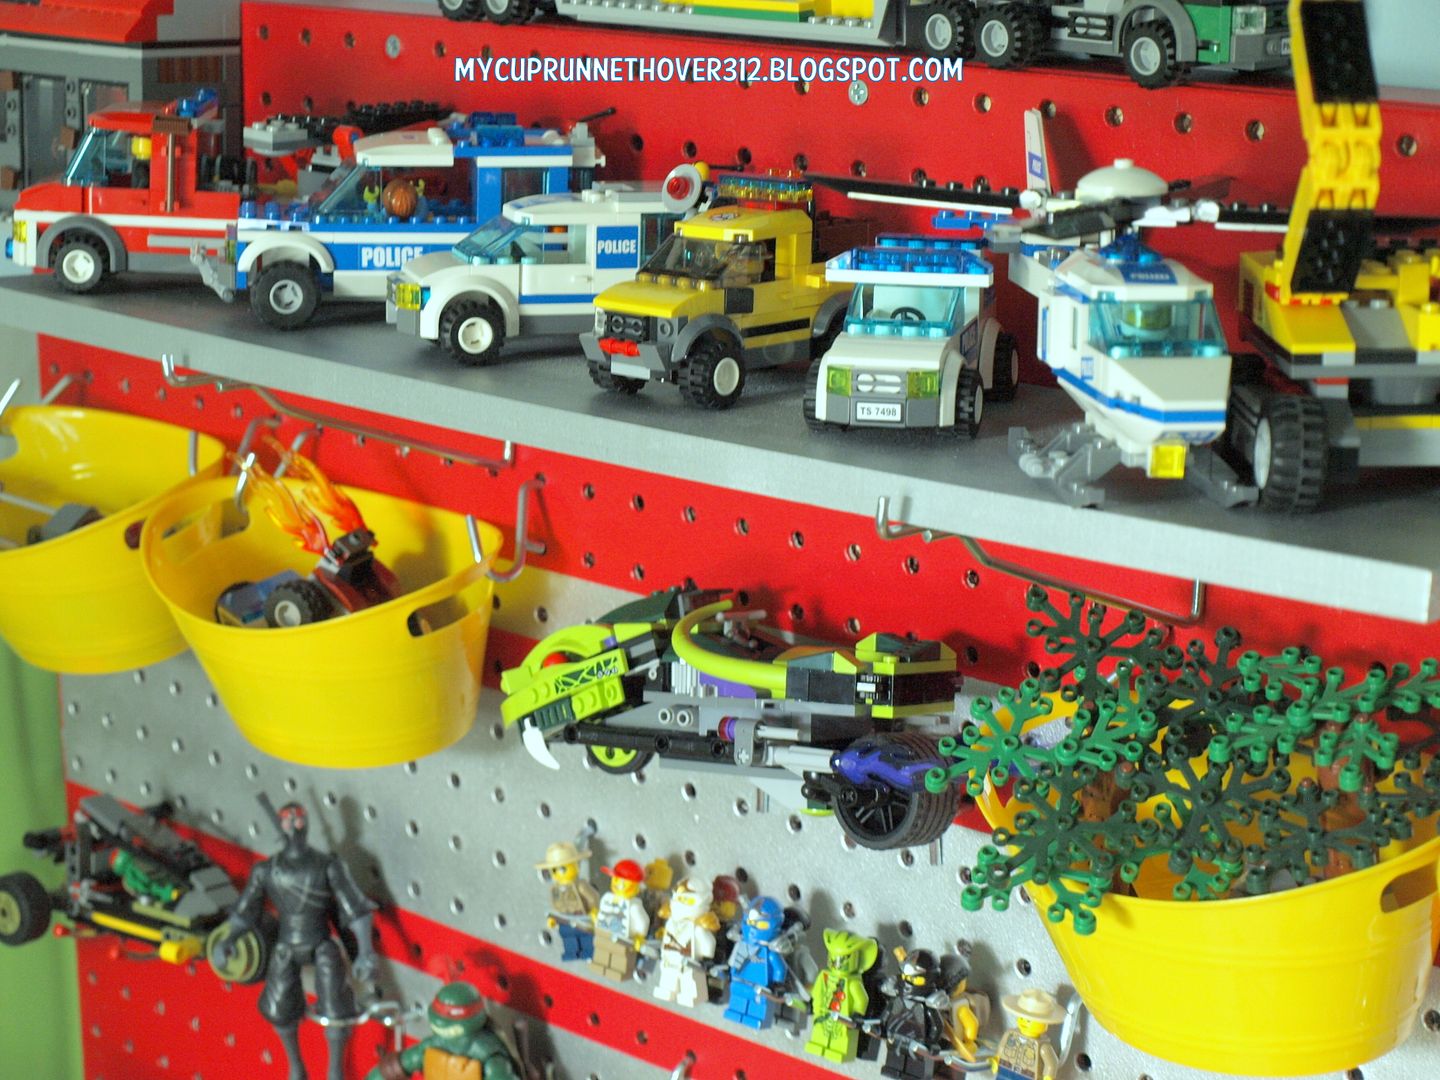
I also spray painted a board in the same metallic to place on the shelf brackets we got as part of a pegboard multi-pack. I purchased some plastic buckets to hold al the smaller stuff (4 for $1.00 at the dollar store). That's it! The entire project cost about $20.00. This is the after...
The Bug and I had fun figuring out how to put everything up and what to do with each bracket that came with the pack. We still have some leftover to add if we want.
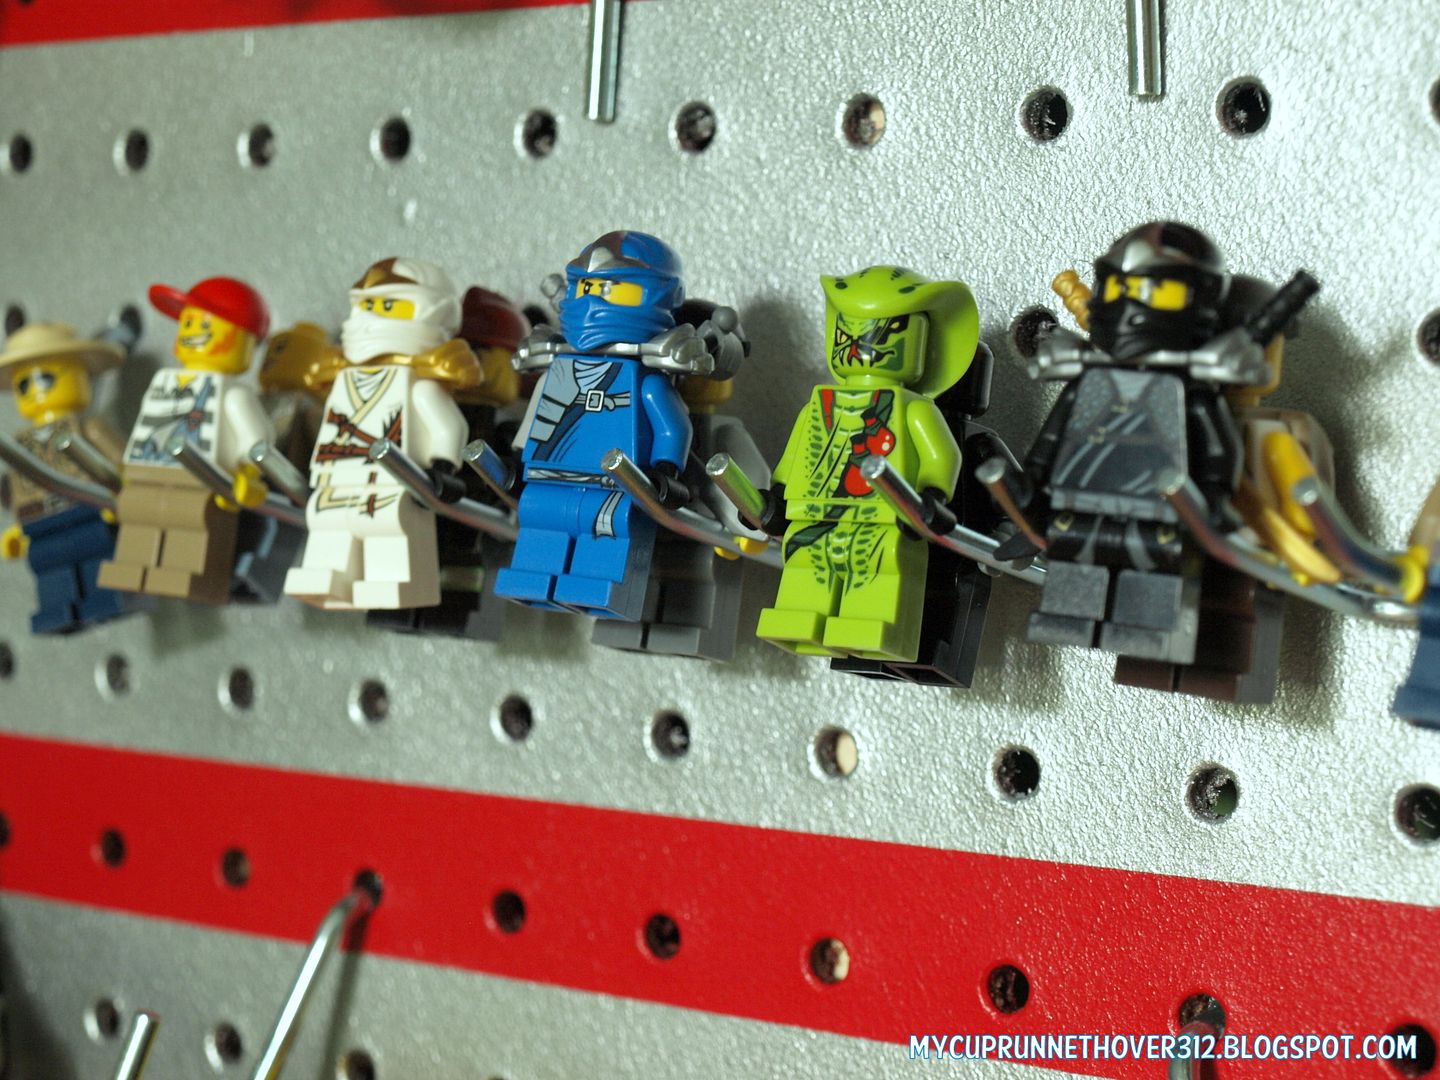
My favorite part of all of it though, is the way The Bug thought of to put the Lego guys up. They just clip onto this rack! AWESOME.
We used straight hooks to hold things up too, sort of like a makeshift shelf.
It it so cool to now see the top of his desk. It's funny, before he would play for a bit and then say he didn't have any room, and now he couldn't wait to sit down and play with everything.
I love how the Ninja Turtles fit in the circle hooks and the foot soldier fits in the screwdriver peg using the one leg.
We really do have more room to add a couple more pegs, but I am saving those for when I notice the desk starting to get cluttered once again. It will happen. I know it, you know it. Let's just enjoy this while it lasts, k? LOL.
We hope you like it!! Have a great week, my friends. We are getting ready for our first camping trip of the season - yes, in a tent! Let me know if you have any other great ideas to store Legos! I would love to hear about it. Have a great day!
Follow on Pinterest / Like on Facebook
 Linking up with these great blogs! Go on over and check them out!
Tater Tots and Jello
I Heart Naptime
Skip to My Lou
Craft-O-Maniac
Lil Luna
Not Just a Housewife
Mom on Timeout
Someday Crafts
Setting For Four
House of Hepworths
Reasons to Skip the Housework
Love of Family and Home
Thrifty Decor Chick
Organizing Home Life
The Hankful House - Get Your DIY ON
Linking up with these great blogs! Go on over and check them out!
Tater Tots and Jello
I Heart Naptime
Skip to My Lou
Craft-O-Maniac
Lil Luna
Not Just a Housewife
Mom on Timeout
Someday Crafts
Setting For Four
House of Hepworths
Reasons to Skip the Housework
Love of Family and Home
Thrifty Decor Chick
Organizing Home Life
The Hankful House - Get Your DIY ON


LOVE IT! NEED IT! My eight year old has a similar "before" desk, yikes!! I am pinning this! ~Kelly @ Eyes on the Source
ReplyDeleteThanks so much Kelly!! Hugs, Cheryl
DeleteWhat a wonderful idea! It came out amazing!
ReplyDeleteSo glad you liked it Susan! Hugs, Cheryl
DeleteThis is amazing! My sons aren't quite to the lego phase yet, but when they get there, this would be perfect! Pinning! I popped over from House of Hepworths--thanks for sharing!
ReplyDelete~Abby =)
Thanks so much Abby for stopping in!
DeleteOMG!! I absolutely LOVE it!! I am pinning this and while my son doesn't have the space for a big peg board above a desk in his room I am going to make him a peg board area by where he keeps all his Legos. We recently organized and divided up his Legos with some containers we got from Dollar Tree. We aren't quiet done but I love this idea!!
ReplyDeleteThanks Sheena! It would be super easy to hang the same pegboard on the wall, even if you didn't have a desk :) So happy you stopped to say HI!
DeleteAmazing, love this! We have a few lego lovers at our house. Would love for you to link this up at our party: http://joyfulhomemaking.com/2013/07/welcome-to-think-tank-thursday-38.html
ReplyDeleteThanks Margo!
DeleteI absolutely love this Cheryl! So fabulous. My oldest is getting pretty into lego... just built him a special storage cart for it- but I love how yours is so great for displaying all the creations. They can get pretty sensitive about keeping their things safe! This is a perfect solution, thanks for sharing it!!
ReplyDeleteThanks so much Krista!!
DeleteGreat idea! Maybe we can add this to the wall above the Lego desk we created for our Lego Master.
ReplyDeleteThanks for sharing!
Thanks so much Daisy! Hope it works for you!
Deletethis is amazing!! My 5 year old has a very similar desk.. I think I am going to attempt to try this! I do have one question, how did you attach the L brackets on the back?
ReplyDeleteThanks so much for sharing!!
Thanks Megan! So glad you like it!
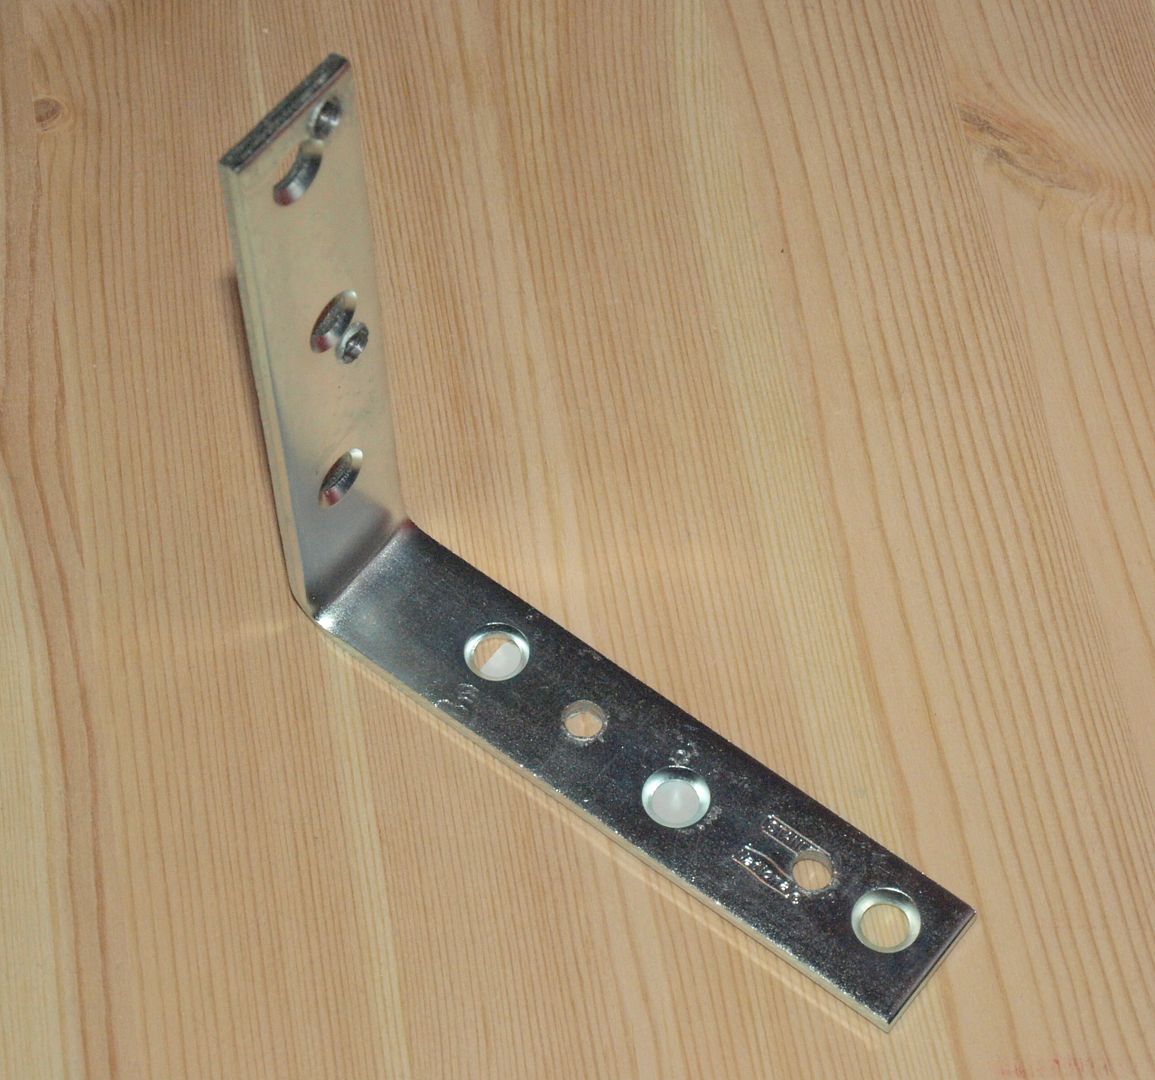
DeleteWe used 3" L-brackets and screwed them into the upright pieces of the 1X2's on the back of the board and to the underneath of the actual desk. The screws actually go into the "back" of the L-brackets instead of the front like normal. I hope that helps! Let me know if not, I can take additional pictures for a visual :)
Have a great day!
Great idea! I am also a Virgo and had to laugh when you mentioned that... Legos are the bain of our existence! lol Love this solution!
ReplyDeleteFound you at Thrifty Decor Chick.
Julie, you are absolutely right! The bain! LOL. Thanks so much for stopping by!
DeleteLove it! What a great idea to build up! I love how your son roped it off...that is so something my son would do! Thanks for sharing! XO
ReplyDeleteHI Christy! Thanks so much for stopping over to say HI! It totally made my day! I really couldn't believe he did that. For safety, or maybe to just to help hold everything on there. LOL. Have a great week! XO, Cheryl
DeleteCheryl this is A-MAZING! My son would love this and I would never seen him. It's it amazing how Legos take over your life? Great idea!! Thank you so much for linking up your organization project with Get Your DIY On- I hope you'll join us for Feb's theme, projects that you Love. See you on the 2nd!!
ReplyDeleteMandy @ The Hankful House Blog
HI Mandy, thanks so much - so happy you like it! Legos have totally invaded our house! Just trying to keep them all in one place ;) Thanks for saying hi! Cheryl
Delete